 Plasty
On this page
Compare the front-view bridge
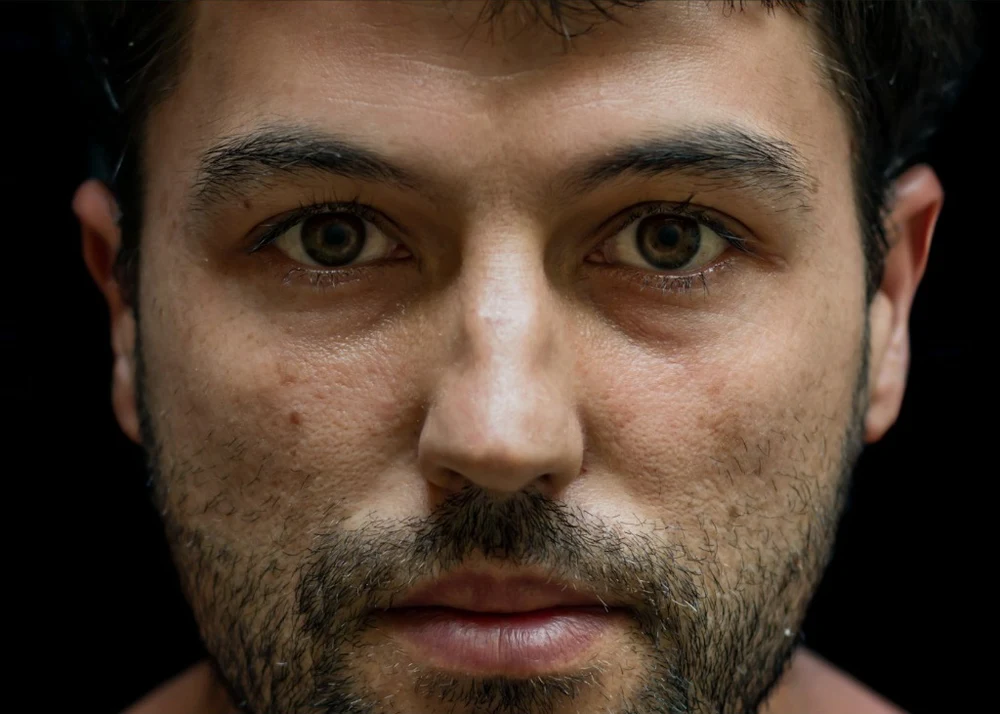
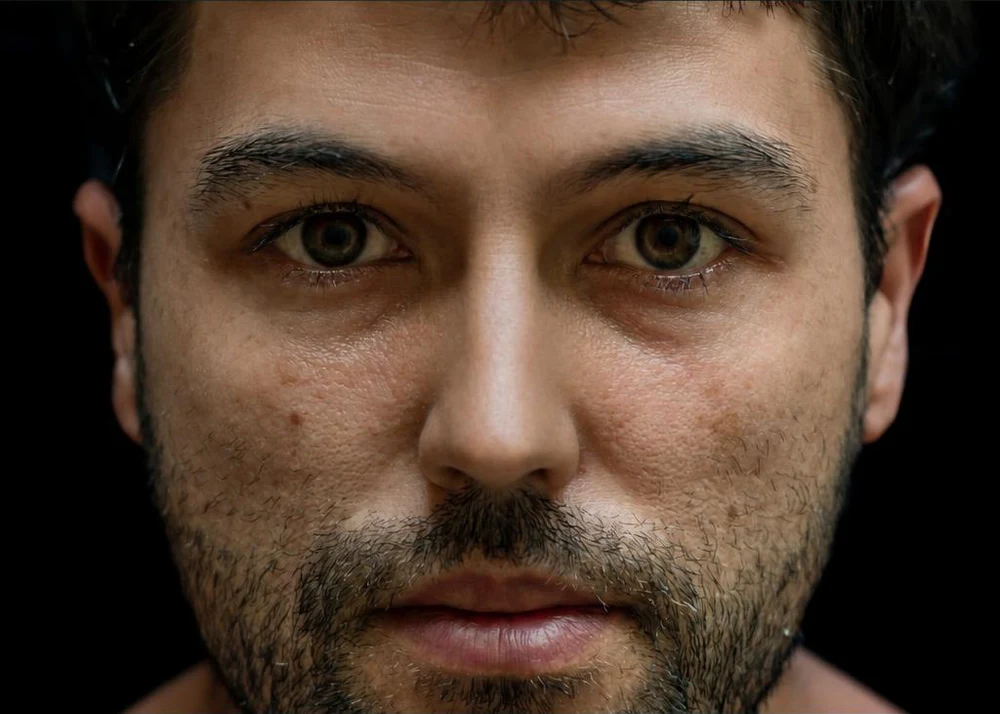
Stock portrait and an actual PlastyAI test output. The model is not a patient or an endorser. This selected example is not a success-rate claim or a prediction of treatment results.
The visible change and the preserved context
In this selected output, the central bridge appears narrower than in the source. Follow both sides from between the eyes toward the middle of the nose. The eyes, mouth and overall face position appear broadly consistent, which helps make the comparison interpretable.
Small texture and lighting differences remain around the nose. These should not be described as surgical changes. The internal visual review accepted this particular bridge example; that is an observation about one output, not a clinical assessment or evidence that all nose edits will succeed. The photographs are presented at matching proportions, without stretching one nose to fit the other.
Front view and profile answer different questions
This front-facing portrait is useful for comparing apparent width. It cannot show a reliable side-profile bridge contour or tip projection. If your question is about a side silhouette, choose an actual profile source rather than asking the model to invent a new viewing angle.
A generated front view and a separately generated side view are not a coordinated 3D surgical model. Do not combine them into an assumed treatment plan. The front-versus-side photo guide explains how to choose a source for a specific visual question.
Keep the nose editor focused
Explore a modest narrowing of the bridge in this front view. Preserve the tip, nostrils, eyes, lips, expression, camera angle and natural skin texture.
Use this sample brief only if bridge width is what you want to explore. It is a suggested instruction rather than a guarantee or an exact reproduction recipe for the displayed output. If the goal is the tip, change the target and ask to preserve the bridge. Avoid asking for a “perfect nose”: there is no objective single appearance that should replace your preference.
Spot a convincing image that missed the request
Compare the same edges, not the overall attractiveness of the picture. A new highlight can make a bridge look slimmer; a slightly turned face can change the apparent width. Check head angle and eye level before attributing a difference to the target feature.
Then inspect the nostrils, upper lip and cheeks. If they moved without being requested, record that as an unwanted change. If the requested edge has barely changed, classify the result as insufficient. Our AI before-and-after checklist gives a repeatable review sequence.
What to take away from a nose job preview
Keep the original, the concept and a sentence naming the preference you want to discuss. An AI image cannot establish whether a real change is achievable, safe or suitable. It also cannot assess breathing or internal anatomy. Use the rhinoplasty guide for consultation questions and the photo-preview workflow to prepare another concept. There is no need to change a feature simply because an editor can visualize it.
Related guides
By PlastyAI editorial · Published . Written with AI assistance and checked against our photo-preview workflow. Product guidance, not clinical advice; not clinically reviewed. Send a correction.